Flash Exercise 4
FOCUS Journalism package with embedded movie clips
PURPOSE Show your competence with movie clips symbols, text and image layout, button control, and all Flash and design skills acquired to date.
> See the example (note that the example shows only six items, but you must show 10 items).
You can download a heavily commented template FLA from this folder (CS5 only; CS4 versions are also available).
VALUE 5 points (see Grading):
- 2 points for meeting all the requirements (below)
- 1 point for perfect functionality (all buttons work without fail; content_mc and scrubber_mc still work properly)
- 1 point for professional appearance (most people would say, "Wow, that's good!" even if they did not know it was student work) -- alignment, spacing, picture choices, typography, color
- 1 point for originality and story value (is it convincing as an informational package? Does it achieve a good balance between too much information and not enough? Does it appeal to a specific audience? This was discussed in class.)
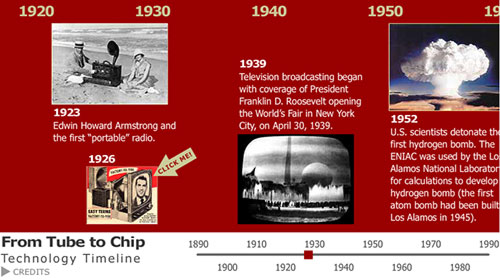
DETAILS Based on the template provided, create an original SWF with journalistic content about a sequence of events or milestones. (The events may be as recent as you like, e.g. something that occurred this year, or they can go far back into the past.) The template provides a sliding timeline that is well suited for showing a sequence of events with text and images.
This can be an impressive portfolio piece for you if you pay attention to BOTH the design and the journalism.
Requirements
- At least two separate movie clips must be added to the content movie clip. In each movie clip, something must be animated (tweened), and that animation must be controlled by a button or buttons. (In the example, the two movie clips are the item at 1926 and the credits.) Animation includes sliding, zooming, and/or fading.
- One of the movie clips must be OUTSIDE the content_mc movie clip. We covered this kind of movie clip in Week 11.
- One of the movie clips must in INSIDE the content_mc movie clip. We covered this kind of movie clip in Week 12.
- Credits for the producer (you) AND your sources must be added to the template. These should be in the OUTSIDE movie clip, as seen in the example. If you have a lot of credits, then your credits panel will be larger.
- At least 10 different events (each with its own date) must appear inside the Content movie clip. (Events or items; I do not mean 10 movie clips.)
- Each item/event must have its own image. That means (at least) 10 images.
- Reset the Bitmap Properties for EACH IMAGE to optimize the file size. This was covered in Lesson 1 in the book. Here is a summary. If you don't do this, your SWF will be HUGE.
- Any image that ZOOMS needs to have "Allow smoothing" turned ON. This is also in Bitmap Properties.
- All text in the FLA should be Classic - Static - Anti-alias for readabilty. These are all selections on the Properties panel. Take care that your small text is READABLE. Hint: Serifs make very small text very hard to read!
- DO NOT CHANGE THE ACTIONSCRIPT in frame 1 in the template, except as noted. Your assignment does not require changes in the script. If you get error messages, the script is NOT at fault (unless you changed it!).
- Give your timeline a unique title (not "From Tube to Chip," obviously); it does not need to include the word "timeline."
- Research all information carefully, and include credits for everything (including all images).
- Fact check ALL information.
- Follow all the instructions below.
- Upload ALL THREE files (SWF, FLA, HTML) to your Web site and send me two properly formatted URLs -- (1) the HTML page, and (2) the FLA -- via one e-mail, by the deadline. (When your URL is formatted correctly, I can right-click to download your FLA.)
NOTE that this FLA file may be quite large. If you are using Plaza for your uploads, you might need to delete some files to make room for this FLA.
TIP: If your FLA seems to be getting larger in file size even though you have not added any new bitmaps, SAVE AS with a different filename. I don't know why this makes a smaller file, but it often does. (It doesn't affect the SWF file size.)
Instructions
- Follow the template FLA provided for this assignment, but PLEASE, make your design LARGER. (Maximum width of Stage: 960 pixels. Maximum width of Content movie clip: No limit!)
- Choose colors and fonts to suit your subject matter.
- Research your subject matter and collect the necessary assets (facts and images). Do not plagiarize. Write in your own words. It will be easier if you research and write your 10 items in MS Word before you begin work in Flash. Gather your images before you begin work in Flash. Resize them in Photoshop BEFORE you import to the Library. Sketching with pencil and paper will also make this assignment easier and less time-consuming.
- Create 10 entirely different informational items -- each one with its own clearly readable date and its own image. THESE CAN BE VERY SIMPLE.
- To add your items: The content_mc movie clip will include all your 10 items, on many different layers. Lots of layers, and locking them, will help you work efficiently.
- Add movie clips and animation AFTER the layout and positioning of the 10 items have been completed. (These movie clips must be in layers on top of the layers containing other visual elements, NOT underneath them.)
- Test your movie very thoroughly to ensure that all buttons work properly. (HINT: Try to "break" your button controls by clicking them in illogical and unusual combinations. If they do not break, you scripted them correctly!)
- We are now using SWFObject to embed the SWF in an HTML page. The instructions are simple; please follow them for this assignment.
- Copy the SWF, the HTML file* and the FLA into one folder.
- Upload the folder, containing all necessary files, to your Web site. NOTE: If you are using Plaza, you may run out of space. You can deal with this by deleting older work from Plaza.
- Send the two URLs to me (see Requirements, above).
* Make sure that your HTML page uses SWFObject correctly, and that you have uploaded the necessary files to your site.
And PLEASE, test your HTML page on your Web server! I do not like to click your HTML and see a page with no SWF visible to me.